
Credit goes to Valgon57 for the Banner.
This is the 2nd review this week related to the release of the Boardwalk Venue that came out with Roaring Heights (sold separately). This venue includes a brand new customizable premium content object and plenty of content to create your own amusement park venue.
There will also be a tutorial included in this review also!
Collection File:
The Boardwalk
Hope you guys enjoy!
AznSensei
Table of Contents
- Part One: Price Breakdown
- Part Two: Theme and Design
- Part Three: Venue
- Part Four: Premium Content and Tutorial
- Part Five: Build/Buy Content
Part One: Price Breakdown
Don't let the item count deceive you, while it may say it has 57 objects (including the lot), technically you will have to treat the 22 roller coaster pieces (including the cart) as one premium content collection. Therefore, you would be getting only 26 Build/Buy Objects, 5 Wallpapers, 1 Lot, and 1 Premium Content Object.
This venue was not on sale upon release date and will be at 1900 Simpoints (like any other venue). The Price Breakdown is as follows:
Coaster Premium Content: 500 Simpoints
Arcade Table: 200 Simpoints
Balloon Decor: 25x2 = 50 Simpoints
Grill: 100 Simpoints
Chess Table: 100 Simpoints
Fence: 50 Simpoints
Foosball Table: 100 Simpoints
Lights: 50 Simpoints
Bench: 100 Simpoints
Amusement Park Entrance Decor: 50 Simpoints
Photo Booth: 200 Simpoints
Picnic Basket: 100 Simpoints
Pinball Machine: 400 Simpoints (Yes the same price as all the pinball machines)
Billiards Table: 200 Simpoints
Rug: 75 Simpoints
Pavillon Decor: 50 Simpoints
Attraction Sign: 50 Simpoints
Standee Decor: 25 Simpoints
Awnings: 75x5 = 375 Simpoints
Spring Rider: 200 Simpoints
Stereo: 100 Simpoints
Picnic Table: 100 Simpoints
Wallpapers: 25x8= 200 Simpoints
Total Cost of Individual Items: 3475 Simpoints
Cost of Venue: 1900 Simpoints
Even though it looks like a bunch of decor, you're getting a roller coaster set, and a bunch of content for approximately almost $35 worth of store content, all for the price of $19 (not even discounted for early bird). If it was an early bird discount, I honestly think this venue would sell more, but it's selling pretty quick judging by the fact many players wanted to get the roller coaster set.
You are also getting tons of objects that have never seen the light of being released in the store: Picnic Basket, Billiards Table, and even the Photo Booth! Honestly, these are must grabs in this venue also.
The price is steep, but if you like everything in this venue, then by all means grab it.
Part Two: Theme and Design
I think the store team did a wise decision in making an Amusement Park-themed venue rather than an Amusement Park world. This works so much better and gives players the ability to enjoy a normal world with a lot dedicated to an amusement park. Please note that while this is NOT a true amusement park, as it is a boardwalk, the content in it adds on and gives you the creative idea of making your own amusement parks.
I can't wait to see what other players build, but the theme is fun, refreshing, and something that was needed in The Sims 3.
Part Three: Venue
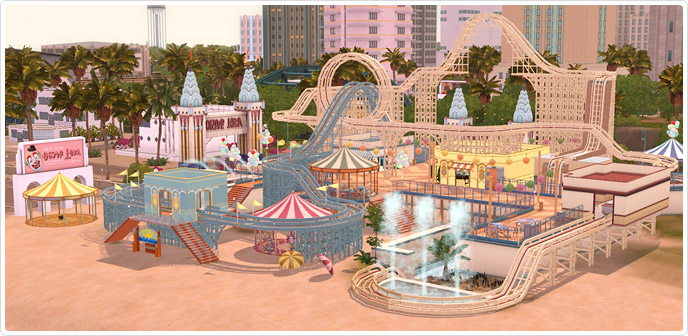
The venue has a nice layout! You have everything on pretty much a typical "boardwalk" and you get two roller coasters, one big and one small. There are areas designated for cafe eating, a children section, and even an arcade room. I think the overall layout of this venue provides players a way to customize their game. Even though it is a 64x64 lot, which is pretty huge, you can still be able to add other content if you desire. Don't want the 2nd roller coaster? You can remove it and put something else in its place! Honestly, the layout is pretty nifty and how the roller coasters are set up is pretty creative!


Part Four: Premium Content and Tutorial
Introduced in the Boardwalk Venue is the Sky High Roller Coaster Cart and Roller Coaster Track Pieces that is the main feature of this venue. While it's probably not going to be sold individually, it provides some new way for your sims to enjoy at a venue rather than sitting at home reading a book. (Yes I find reading a book sometimes boring nowdays lol).
While in the past I may say that the premium content is only small compared to the tons of objects/clothing that come in worlds/venues, I think this particular premium content is an exception to that focus. Honestly, if you are NOT thrilled about this roller coaster set, then why on earth did you buy the venue? This roller coaster set is not a single object, rather you can mix-and-match multiple pieces, make your own creative tracks and so much more!
Below are all of the pieces provided by SimGuruCopeland that come with this roller coaster set:

While the flag is not included in this picture, I do think it's a nice accessory to your roller coaster set, totaling to about 22 pieces in this premium content collection. That's really awesome that the store team had made us customize our own roller coasters. While it's not as fun as the one you can find in The Sims 1, it provides just enough fun making your own roller coaster!
You can also make a roller coaster in a residential lot if you want to!
This coaster comes in three themes that are selected only by certain pieces labeled in the picture above.
- Wonder
- Thriller
- Horror
Each theme has its own moodlet when you ride the roller coaster, and while it's not too much of a difference, you get to see your sims reactions depending on the theme.
While looking at the pieces make you think that it's tricky in making the roller coaster, it really isn't "too" tricky and hopefully you'll guys get the hang of it. That is why I am providing you a small tutorial on making your roller coaster.
Tutorial:
BEFORE YOU BEGIN: Please decide what color you want your pieces to be. I'd recommend recoloring all of them and adding them as color options before placing them or you can recolor at the end. Sadly, you can't recolor all of the pieces in one go and will have to be recolored piece by piece.
The Roller Coaster needs a foundation in order to start building it, which is why we have these pieces called the "support" pieces that help make your roller coaster. Think of these as your columns for placing tiles on top. Once you place these down, you can place tracks on top, if you want that elevation. If you just want a flat coaster (which I won't judge publicly but question why you want a flat coaster....) then you don't need these pieces. Below are the important pieces in placing your tracks on.

The next part are the actual track pieces that must be connected appropriately. Below are the images of all of the track pieces themselves.

What's really important is that you need the loading track in order to place your cart and start your roller coaster. Make sure this piece is added first before you begin your layout for your roller coaster. This piece requires 18 tiles, so if you want to draw your roller coaster on graph paper, then use 18 tiles for the measurement of this piece.

Keep an eye out on certain pieces as they have arrows on them which show that they only go one direction. If you want to make a valid track, make sure you know which direction the arrow is pointing. Note that if there are no arrows, the piece can go both ways.

Finally, these particular pieces can be designed on the theme, and the theme will decide what type of interaction your sims will have in the ride.

Now that you know which pieces does what, now it's time for you to build your content. While it may be tricky, just follow this step by step and hopefully you can get this roller coaster functional and running.
First, you should decide if you want to start on the ground, or on a foundation, or even on a floor level. Make that decision first and place your landing zone. In this scenario, I'm placing it on the ground.
Next, add a straight track so that your cart can just move forward first, before you add curves or make your cart go up.

You'll then want to gradually add the one-story, then the two-story, and then the three-story supports if you want your car to move higher. It is best to place the one-story first, and place it 6 tiles away from the track, as shown below.

Now, you should see that you are now on top of the support, you'll need to find the "Up and Down" track piece and place it on top so it would look like this. See, it fits perfectly! ^_^

Now you can use the multi supports and place them anyway you like it. For now, I'm going to use multiple one-story supports so my sim can get the most out of the roller coaster.

After adding the one-story supports, get the track pieces that fit the one-story supports and place them on top as shown below.

Once that's done, you can choose to add even higher stories, like shown below. You also don't need to add multiple supports if you don't want to.

To make it look more authentic and creative, use the awning pieces to make it look stylish as a roller coaster. Just make sure to place a support first, then place the awning on top so it fits on the coaster.

If you don't want to add a lot of supports, just know that the straight pieces need just another support 5 tiles away from the other one in order to work. The awning does help add 1 more tile, so you can probably go up to 6 tiles away if you want to extend it further.

Now you have a gorgeous upper level with awnings and all.

Now let's get a little wacky and add a curved track and one of those loops. In order to add a loop, you'll need 18 tiles of support, so 3 support pieces should help. Make sure the arrow is pointing in the right direction also.

After turning the track around, and lets go straight towards the other track. Notice what I'm setting up for as I want to go over it.

Add a three-story support 6 tiles away from the track so you can go up a level, then add another 3-story support on both sides of the track. Then go up a level, and add curved tracks to look like this.

Let's go ahead and add a dead drop to this part, seems like a fitting place. Just use a support to place the dead drop on top of and it should look like this.

Add the broken track if you wish, or add other tracks if you want.

Now find a way to go back to the original starting point. Sometimes, you might have to replace the multiple support pieces and place the individually support pieces.


Now your coaster is complete! While it may not look spectacular, I hope to see some amazing builds that players create with this set.

Let's set the theme (during game mode) by right-clicking the appropriate pieces and decide which theme you want. After you find your theme, we can now test the track. If you click the "Test for Valid Track" option, it will highlight if your roller coaster will fully go from start to end. If not, you'll find where it doesn't continue.

I used my sim to test the lot, and you can see that he made it from start to finish without any problems. He did get the moodlets associated such as being soaked along with the thrill ride moodlet since I designated it as a Thriller theme.


And there you have it! Hopefully this tutorial wasn't too bad and if you have more questions, feel free to ask! Sometimes you just gotta do some twists and turns in order to make your roller coaster functioning, but practice makes perfect!
Part Five: Build/Buy Content
Going to go straight to the point as plenty of the build/buy content has content that is normally found in EP, or never released in the store. Also, it does a re-style of the pinball premium content (honestly it's considered not premium content for me) and includes it. You also find amusement park-themed decor such as balloons, pavillons (to make faux carousels which I hope will be a future premium content *wink store team*) and other content that makes it look like an amusement park.
Anyways, below are the pictures of all of the build/buy content and the recolorable areas.
Dastardly Diamonds Arcade Table

Boardwalk Balloons #1 (Best placed on Fence)

Boardwalk Balloons #2 (Best placed on Fence)

GrillWhiz XL Barbeque

King of the Park Chess Table

Grated Fence

Miniaturized Soccer Foosball Table

Simply Stringed Outdoor Lighting

Dynamic Duo Love Seat

Entrance of Grandeur

Timeless Memories Photo Booth

Oscar's Picnic Basket

Flipper Flapper Pinball

Bold Billiard's Table

Jolly Pavillon Rug

Jolly Pavillon

Attraction Sign

Amusement Standee

Festive Awning

Classic Awnings (Left, Center, Right, Corner)

Gallopin' Gertle Spring Rider

Blast From the Past Stereo

Park and Eat Picnic Table

Wallpapers:


Other than that, that is the end of my review! I don't think I need to score this one as it's pretty good enough that it doesn't need a rating. So if you like amusement park content and roller coasters, by all means grab this venue!
Cheers,
AznSensei
I love both your reviews. Thank you so much for doing both collection files. However, the second one, The Boardwalk, isn't showing up. I've downloaded & put it in my collection folder, started up the game, got into a house to check, & it's not there. The Roaring Heights one is. Just to be sure, I got out of the game, deleted The Boardwalk collection file, redownloaded it & installed it, got back in game, & it's not there still. I have no clue why.
ReplyDeleteHuh that is weird, I'll have to reupload the Collection File then. Thank you for posting! ^_^
DeleteOh, and I did buy the gold edition of Roaring Heights & used those points to get The Boardwalk. Thought I'd mention that in case you wonder about that.
ReplyDeletei just bought yesterday roaring heights and this venue to go with it. It is the first thing I have ever bought from the store, and i can't figure out how to place this venue! I want to place it in roaring heights, but i can't figure out how! Can you help?
ReplyDeleteyea that the problem im having
DeleteOk I need help I got the gold edition but I cant find the board walk in game I just have the pieces to the boardwalk but I don't have the whole boardwalk as shown.Can you help me plz?
ReplyDelete